Archive for the 'Web2.0' Category
Alwees Froosh 
October 28th, 2007
That is the name of the application that Jake, Chris and I made for the inaugural Nitobi Hack Day last Saturday.
Yes, we may have had the biggest team and yes some teams didn’t even stick around until the sweet, sweet beer but we came within a whisker of winning it all! Of course, how you split up a single iPod Nano amongst three people is anyone’s guess.
The idea behind the application was that we wanted a desktop app that would be running all the time and would bring in information from many different sources about music artists / bands that you like. In particular, I never know when new albums come out from bands that I like. The trick is that we use, in this case, your top tracks XML listing from Last.fm to determine what you like - ie what you listen to most is what you like. Then we use that info to look up different information about the bands. At the time of building the application we decided on two things to bring in; new releases and events. The original reason that we went with the AIR application was because I wanted to use my iTunes XML file. We found a problem with that early on - my iTunes XML files is >7MB and AIR has a tough time opening it. That is when we decided to go with Last.fm.
I will release the app shortly once I get some time to fix it up.
We were able to deal with the new AIR security model pretty easily and of course chromeless windows and all the great CSS3 support was much appreciated!
Posted in Web2.0, AJAX, JavaScript, Nitobi, air, hackday, adobe, adobeair | 5 Comments »
How Do You Jiibe?
October 16th, 2007
 We have recently been working hard on a new “Web 2.0 social networking” application and are finally ready to release the beta to the world.
Say hello to Jiibe.
The problem that Jiibe is trying to address - as if being a social networking application wasn’t enough - is to help people think about the culture at their place of work and how well that culture jives with what they would find ideal. By answering a few quick questions about their workplace culture the user creates their own personal Jiibe and at the same time contributes to the overall Jiibe culture signature for the company they are currently working at. It is a great way for people to figure out what they like and don’t like about their company culture and also to help them find companies that have a culture they would mesh well with.
One of the other cool features is that people can ask questions to everyone at a company which can generate discussions around certain topics at a company. If only Joe had Jiibe to ask people who actually worked at EA what it was actually like to work there!
I would definitely encourage people to go and check out Jiibe and answer some questions for their current and / or former employers to help people make more informed decisions about where they want to work. As with any Web 2.0 application Jiibe is currently in Beta so things will still be changing as we work more on the application and add features that users demand.
Posted in Web2.0, Nitobi, jiibe, culture | 4 Comments »
Salesforce.com AIR Application
July 18th, 2007
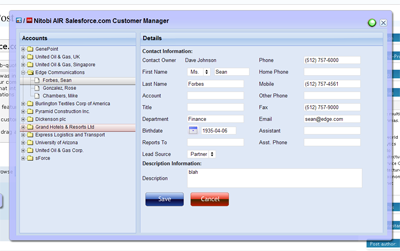
Since Andre was invited to go on the Adobe AIR bus tour we decided to build a cool sample application that would exhibit some of the cool features of AIR and our components. Since we like to focus on the “business case” for our Ajax components and our custom development, we built an AIR application that integrated with the Salesforce.com API. Being the RIA nutters that we are and knowing that most people would be building Flex based applications - which we are currently building a few of for various customers - we decided to build an HTML / Ajax based application instead.
The cool AIR features that we wanted to show off were things like
1. custom chrome to make things look hawt
2. drag and drop from the desktop for vcard integration
3. file system integration for taking things offline
Since we had a pretty tight timeline we went fairly simple and built the application in about three person weeks. The idea was centered around a mobile sales person being able to have access to their Salesforce Account and Contact data while online or offline. Of course, being an Ajax application it should also prove to be a much nicer interface than the current Web 1.0 based Salesforce user interface - man would I like to be able to redesign the Salesforce UI!
Custom Chrome
The most important part of the application was to make it look hawt. This involved a bit of design assistance from Alexei and the creation of some JavaScript and text based activity indicators since animated gifs don’t work in the current AIR beta  What we did use a lot though was the CSS3 border-image style. It doesn’t seem to work quite right but if you just go with it you can make something that looks half decent.
So on the outer window we applied a style like this:
-webkit-border-image:url(../images/app-border.png) 18 18 18 18 stretch stretch; border: 18px;
Where the app-border.png looks like this:

As well as looking great the chrome needs to be functional. It needs to have minimize, maximize, restore and close buttons. It needs to be resizable and draggable. Maximize, minimize, restore and close are easy - for example:
window.htmlControl.stage.window.restore();
All of those methods (restore, close, minimize, maximize) are created on the nitobi.air.Window JavaScript class. To enable draggability we attach an HTML event handler to the our main window DIV element like this:
nitobi.html.attachEvent($(”main_window”), “mousedown”, handleMove, this);
The handleMove method is shown below where we just do a quick check first to see if the element that the user is trying to drag has the chrome class on it - this lets us make the window draggable from various points like the header and around the edges. Once they get the chrome we just call startMove() like this:
nitobi.air.Window.prototype.handleMove = function(evt)
{
if (nitobi.html.Css.hasClass(evt.srcElement, “chrome”))
window.nativeWindow.startMove();
}
Desktop Integration
The other cool thing about using AIR is that rather than having some ridiculous multi file upload utility written in Java or Flash, with AIR we can just take files from the desktop and drag them onto the application. What this means is that we can take things like VCards or CSV files full of contact information and have them automagically entered into Salesforce. If offline they get saved as updategrams and get uploaded once the computer is back online. The events for the drag and drop are Flex events on the AIR htmlControl but they connect to JavaScript methods as handlers.
window.htmlControl.addEventListener(
runtime.flash.events.NativeDragEvent.NATIVE_DRAG_ENTER,
nitobi.lang.close(this, doEnter));
window.htmlControl.addEventListener(
runtime.flash.events.NativeDragEvent.NATIVE_DRAG_DROP,
nitobi.lang.close(this, doDrop));
When the drag operation enters the AIR window we call the acceptDragDrop method with the htmlControl as the only argument. This will enable dropping onto our HTML application.
nitobi.air.Window.prototype.doEnter = function( e )
{
if(e.transferable.hasFormat(air.TransferableFormats.FILE_LIST_FORMAT ) ) {
runtime.flash.desktop.DragManager.acceptDragDrop(window.htmlControl);
onDragEnter.notify();
}
}
Now that we have enabled dropping on our HTML app we can actually process the information when it is dropped by accessing the transferred data like this:
nitobi.air.Window.prototype.doDrop = function( e )
{
var files = e.transferable.dataForFormat(
air.TransferableFormats.FILE_LIST_FORMAT,
air.TransferableTransferMode.CLONE_PREFERRED );
for( var f = 0; f < files.length; f++ ) {
onDragDrop.notify(files[f]);
}
}
In this case we specify that the drop should be a list of files and we are able to iterate over that list to add each of the VCards to Salesforce.
Offline Operation
Finally, we did some filesystem integration for working offline and that was pretty cool. Rather than using the SQL-Lite database that comes with AIR, we wanted a solution that would be more conducive to a web way of working - ie something that will essentially queue HTTP POSTs and subsequently POST them when a network connection is present. Because frankly, unless you have A LOT of data on the client and interfacing to a SQL-Lite database is generally going to be overkill and make a lot more work for the developer since they will have to write not one backend in their server language of choice but also a client side backend in JavaScript. Anyhow, in the Nitobi CompleteUI framework, all changes on the client are stored as XML “updategrams”. So it was a pretty easy task to put a layer between the client side JavaScript DataTable and the XMLHttpRequest that sends data to the server when it is “saved”. Instead of the data being sent to the server with an XHR, if the client is offline the updategram is just persisted to disk. Even when online, the data is continually saved to the disk for offline use at any time. All this took very little extra coding since we just serialized the server messages rather than actually transforming them into SQL statements that would store the data in SQL-Lite.
For all of this to work we needed to be notified when the computer is connected to the network. This is done in the nitobi.air.Window class by using the AIR service monitor. This has the additional requirement of having the servicemonitor.swf library in the web page by using a script tag with the src as servicemonitor.swf. To create the service monitor we do something like this:
var req = new air.URLRequest(’http://www.adobe.com’);
this.monitor = new window.runtime.air.net.URLMonitor(req);
this.monitor.addEventListener(
air.StatusEvent.STATUS, handleStatusChange
);
this.monitor.start();
Where the handleStatusChange method will notify any objects that are connected to the the onOnline and onOffline events of the nitobi.air.Window class.
nitobi.air.Window.prototype.handleStatusChange = function(evt) {
// Fire the event for online / offline notification
if (evt.code == “Service.unavailable”)
onOffline.notify();
else
onOnline.notify();
}
For writing the data to disk we use the AIR filesystem integration and wrap it all in two IO methods for reading and writing. The air.File.applicationStorageDirectory is (on Windows) in c:\documents and settings\username\application data\Application-Name folder.
nitobi.data.IO.readXml = function(filename) {
var file = air.File.applicationStorageDirectory.resolve(filename);
var stream = new air.FileStream();
stream.open(file, air.FileMode.READ);
var str = stream.readMultiByte(file.size, air.File.systemCharset);
stream.close();
return nitobi.xml.createXmlDoc(str);
}
nitobi.data.IO.writeXml = function(xmlDoc, filename) {
if (typeof xmlDoc != ’string’) xmlDoc = nitobi.xml.serialize(xmlDoc);
var file = air.File.applicationStorageDirectory.resolve(filename);
var stream = new air.FileStream();
stream.open(file, air.FileMode.WRITE);
var str = stream.writeMultiByte(xmlDoc, air.File.systemCharset);
stream.close();
}
I think that those were definitely the coolest parts of the application and made for a a pretty sweet little app for managing Salesforce Contacts and Accounts. There is still a little more work that I would like to do in the coming weeks like allowing adding and saving of both Contacts and Accounts without VCards as well as some other searching features. Alas, this will have to do for now  Also, when Adobe gets XSLT support in there it will be even more awesome!
You can check out the half baked source code here and get the AIR application for installation here. I am working on a version of the AIR app that will allow the user to enter their Salesforce.com credentials and actually see their data - and there will be a HUGE disclaimer that you use at your own risk 
Update: I just found out that the Mac version of AIR does not have XPathResult (!!!) so selectNodes doesn’t work … sorry Mac users but it should be fixed soon.
Posted in Web2.0, AJAX, Nitobi, completeui, air, onairbustour, salesforce | 7 Comments »
Declarative Ajax and Flex Interop
July 3rd, 2007
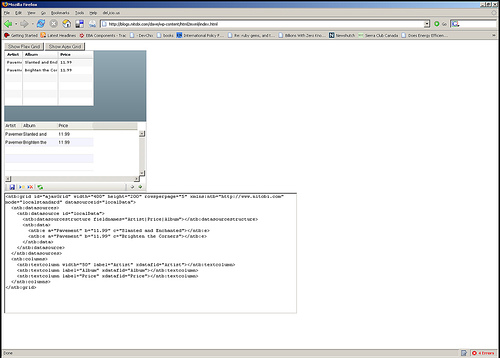
This is some code that I wrote about a year ago at the Flex Component Developers Summit (and more recently presented at XTech) to show how declarative Ajax and Flex can work together to create dynamic, rich and compelling Internet applications.
The idea is simple. Take a single declaration - in this case XHTML - of some user-interface component and then use it to build a UI using either Ajax or Flex. All this from just one declaration.
What happens is that we take a single declarative data grid and converts it using XSLT on the client (so it only works Firefox, IE and soon Safari) into a declarative Nitobi Ajax Grid and to a Flex declarative MXML DataGrid. I use the FABridge to get the string of MXML generated from the XSL transformation into a stub Flex application where a Flex DataGrid is instantiated (deserialized) from the MXML declaration. It can an be seen live here (note: create the Flex grid first then the Ajax one - something funny that I can’t be bothered to fix  ) and the code can be downloaded from here.
So by using a declarative approach and a little XSLT on the client we were able to quickly choose between using a Flex DataGrid or a Nitobi Ajax Grid to display our tabular data in!
Really the most interesting part is the MXML deserialization stuff. The only contents of the Flex application are two functions for performing the deserialization. I have listed the main part of the code that takes an XML document of an MXML DataGrid declaration and actually instantiates a DataGrid according to that declaration. It’s pretty quick and dirty but at least gets the right thing out! Essentially it just looks at each XML element and creates an Object out of it and sets all the properties on it from the XML element attributes and then recurses through the child elements doing the same. There are some special attributes though like datasources that need a little more care.
public function initGrid(html) {
// setup a tagname to datatype hash - maybe this already exists somewhere
controls['DataGrid'] = 'mx.controls.DataGrid';
controls['ArrayCollection'] = 'mx.collections.ArrayCollection';
controls['Object'] = 'Object';
controls['columns'] = 'Array';
controls['DataGridColumn'] = 'mx.controls.dataGridClasses.DataGridColumn';
// load the HTML into XML DOM
var mxml:XML = new XML('<root>'+html+'</root>');
parseXml(AjaxBox, mxml);
}
public function parseXml(parent, mxml) {
var item:String;
// get all the elements in our XML doc - this should of course walk the xml tree recursively
var itemList:XMLList = mxml.elements('*');
for (item in itemList) {
// get the tag name of the XML node
var tagName:String = itemList[item].localName();
// get the class by using getDefinitionByName() method
var ClassReference:Class = Class(getDefinitionByName(controls[tagName]));
// create an instance of the class
var myObject:Object = new ClassReference();
// get all the attributes and set the properties
var attrList:XMLList = XML(itemList[item]).attributes();
for (var attr:String in attrList) {
myObject[attrList[attr].localName()] = attrList[attr].toString();
}
// now parse the children of this node
parseXml(myObject, itemList[item]);
if (parent.hasOwnProperty(tagName)) {
parent[tagName] = myObject;
} else if (parent.hasOwnProperty("length")) {
if (parent.hasOwnProperty("source")) {
parent.source.push(myObject);
} else {
parent.push(myObject);
}
} else if (parent.hasOwnProperty("dataProvider") && tagName == "ArrayCollection") {
// This means we need to create a datasource for the Grid
parent.dataProvider = myObject;
} else {
parent.addChild(DisplayObject(myObject));
}
}
}
Posted in Web2.0, AJAX, XSLT, Flash, Flex, Declarative Programming, Components, Grid, RIA, FABridge | 1 Comment »
RobotReplay Beta is Live
April 15th, 2007
We have finally released the public Beta of our RobotReplay service. What RobotReplay does is it records the mouse movements, clicks, and key presses and allows you to play them back. The service is completely Ajax based with no special plugins. Right now we don’t have much in the way of features but we are going to be constantly adding more and listening to our users about what they want to see.
First take a look at Andre’s screencast.
Otherwise, just sign up now and see what your users are doing.
Posted in Web2.0, AJAX, robotreplay, ignite, web2expo, cynelitics, analytics | 4 Comments »
Declarative Google Maps
April 7th, 2007
We are pretty big fans of the declarative approach to Ajax. Our up and coming Complete UI Ajax component product line is firmly based around declarative programming. The idea behind this is that the developer can use HTML like markup to define the majority of the component functionality while still being able to write a little bit of JavaScript to get the extra 20% of custom functionality that they need.
As an example of this I have put together a declarative Google Map. Currently it only supports a few declarative tags but it at least serves to give you an idea of how a regular JavaScript component could be wrapped declaratively. It could also be simplified quite a bit by building a JavaScript component from the ground up with declarative programming in mind - as the Nitobi framework enables of course
If you went about putting a Google Map into a web page imperatively, it would look something like this:
var map = new GMap2(document.getElementById("map"));
map.setCenter(new GLatLng(49.290327, -123.11348), 12);
var polyline = new GPolyline([
new GLatLng(49.265788, -123.069877),
new GLatLng(49.276988, -123.069534),
new GLatLng(49.276988, -123.099746),
new GLatLng(49.278108, -123.112106),
new GLatLng(49.2949043, -123.136825),
new GLatLng(49.3029641, -123.145065)
], "#ff0000", 10);
map.addOverlay(polyline);
The result of this is a nice Google Map that shows part of my daily bike ride to work. If you view the source of the web page you will see just that same code.
On the other hand, we could make that same web page declaratively meaning that we don’t have any extra JavaScript code to write but instead define our Google Map through custom HTML markup. This has the advantage, on top of the many advantages (and disadvantages) of declarative programming in general, that most web developers are familiar with HTML markup though might not be as comfortable with writing JavaScript code. So the equivalent declarative Google Map might look like this:
<g:map id="map" width="370px" height="380px" smallmapcontrol="true" maptypecontrol="true">
<g:center zoom="12">
<g:point lat="49.2853" lng="-123.11348"></g:point>
</g:center>
<g:polyline color="#FF0000" size="10">
<g:point lat="49.265788" lng="-123.069877"></g:point>
<g:point lat="49.276988" lng="-123.069534"></g:point>
<g:point lat="49.276988" lng="-123.099746"></g:point>
<g:point lat="49.278108" lng="-123.112106"></g:point>
<g:point lat="49.294904" lng="-123.136825"></g:point>
</g:polyline>
</g:map>
All the same elements are there as the imperative JavaScript version but there is no code to worry about. And, of course, the result is also the same. Here is a direct link to the source code - the top 1/3 of the code is the only interesting stuff, the rest is just helper functions that poached from the Nitobi Ajax Toolkit.
Take a look at the source code if you are interested in the details. Btw it currently has only been tested in Firefox 1.5 and IE 6/7.
This will be some of what I talk about in my session at XTech.
Posted in Web2.0, AJAX, XML, Declarative Programming, Components, Google, Map | 3 Comments »
Enterprise Ajax Sample Chapters
March 15th, 2007
So I have finally gotten around to posting a sample chapter from the upcoming Enterprise Ajax tome written by yours truly along with Alexei and Andre. If you are so inclined you can even pre-order from Amazon to the right ->
The available chapters are number 3 - currently named Aajx in the Browser - and number 8 - currently named Ajax Usability. Chapter 3 is an overview of Ajax and how it relates to many of the traditional design patterns enterprise developers should be familiar with while chapter 8 covers usability issues and solutions. Without further ado, here is chapter 3 and here is chapter 8.
Please post any comments / questions if there is anything that needs revising or is missing.
Posted in Web2.0, AJAX, Nitobi, enterpriseajax | 4 Comments »
XTech 2007 - Declarative Progamming
March 11th, 2007
It looks like I will be in Paris to give a presentation at XTech 2007 (May 15-18).
I will be talking about declarative approaches to Ajax and looking at some of the important cross browser issues that may be encountered. I will also give a quick high level overview of some of the important declarative languages that we can use for guidance and inspiration.
Ping me if you will be in Paris during that time - I will also be spending a little time in London around then as well.
Posted in Web2.0, AJAX, Declarative Programming, Nitobi, Conference, xtech | 1 Comment »
Flickr Login
February 17th, 2007
So how many people are going to keep using Flickr in the face of a forced migration to a Yahoo! ID?

Posted in Web2.0, Flickr | 1 Comment »
Ajax Deleting
January 25th, 2007
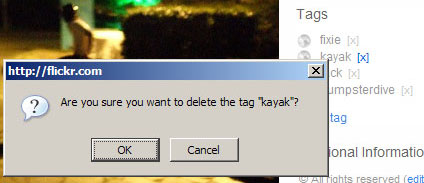
The topic of this post is about deletion using Ajax. Truth be told, it’s not really even about Ajax but about the deletion pattern and related user experience in general.
So often it is the case that when a person deletes some data - like a photo tag in Flickr for example - the application insists on confirming that the user really wants to delete the item. This kind of interaction is really annoying when you are deleting several items from a list or even just one when you are a “power user”. In fact, more often than not, the user wants the delete to occur immediately and requires no confirmation. The confirmation dialog is just an over-engineered catch all for those rare cases when the user presses the delete button in error. In the case of Flickr photo tags then who even cares if you accidentally delete one tag?
There are a few good options for Ajax delete that I think one consider when building data intensive web applications.
- Make the delete button smaller but communicate its meaning more clearly.
Using large and unfamiliar buttons for signifying a delete action makes it easier for a person to make a mistake - thus re-inforcing the need for a confirmation dialog. A smaller button means the user has to work a little harder to perform the delete operation, but not quite as hard as confirming the delete, and the more clear the button is for deleting (through a tooltip or whatever) then the fewer inadvertent deletes there will be.
- Store all deleted data the client before executing the deletes.
Although it could be a good option, the previous suggestion still provided no way to undo a delete. To that end, rather than having a difficult confirm dialogue the developer can take a different approach to deletions such as batch deletions with a single confirm dialogue or even an easy way to roll back the deletes if they are in error. I imagine the reason for using a confirm dialogue is because it is easiest for the developer, but certainly not the user.
- Use a timer on the delete action giving the user the opportunity to cancel the delete.
Finally, an approach that could encompass both of the previous suggestions would be a delete timer. This would be an animation to indicate that the item is pending a delete in say 5 seconds. The key here is that this is ample time for the user to cancel the delete if they want but otherwise the deletion will continue if the user does not take any action to prevent the delete from happening.
At any rate, this is one area where most web application fail miserably and there are great advances to be made with Ajax based applications.
Posted in Web, Web2.0, AJAX, JavaScript, DHTML | 6 Comments »

 Entries (RSS)
and
Entries (RSS)
and