


The components currently supported for .NET are combobox and Grid. Setting up Visual Studio with our components requires two steps: copying over the JavaScript and CSS files, and adding the component libraries to Visual Studio's toolbox.
IF YOU ARE NOT AN ASP.NET USER: Please refer to the General Installation and Integration article instead!
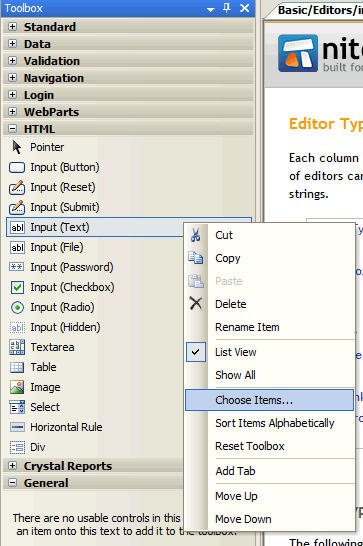
Add Component Libraries to Visual Studio's Toolbox
The first necessary step is to add the component libraries, which are packaged as DLL files, to Visual Studio's toolbox.
- Open Visual Studio and create a new C# or Visual Basic Web Project.
- Open up your Toolbox - if you can't see it, you can turn it on by going to View -> Toobox. Right click on any toolbox item and click 'Choose Items'. Alternatively, you can open this dialog by going to Tools -> Choose Toolbox Items… See the image to the right for more details.
- From the .NET Framework Components tab, click on 'Browse…'.
- Browse over to your Nitobi installation directory. In the server_libraries/dotnet sub-directory, you will find 1.0 and 2.0 directories. Explore the directory that pertains to the .NET framework version you use. If you use one that is newer than 2.0, simply explore the 2.0 directory.
- Here you will find two DLL files: one for Grid and one for combobox. Add both!
- After you close down the Toolbox Items dialog, the components should be available in the toolbox, just like in the image below.

Setting Up Your Directory Structure
The components currently supported for the .NET framework by default expect some JavaScript and CSS files in the same directory as your .aspx page. You can choose to either:
- Adhere to this default directory structure, or
- Specify the location of the dependent files by configuring your component's properties.
Following Default Dependent File Structure
By default, any .NET pages that contain the combobox or Grid components assume the existence of a few dependent files, right in the same location as the .aspx page itself. These files are:
- nitobi.toolkit.js: This is the main JavaScript file containing most of the essential functionality for the Nitobi framework. This file is located in your Nitobi installation directory, under the javascript_css/script sub-folder.
- nitobi.grid.js or nitobi.combo.js: The main JavaScript component files pertaining to each of the individual component functionality. These files are also located in your Nitobi installation directory, under the javascript_css/script sub-folder.
- Nitobi Stylesheets and Theme Files: The components also rely on some basic stylesheets. It is recommended to copy your javascript_css/style folder to the location of your web page, and rename it to styles. The contents should include some component-specific stylesheet files, as well as sub-directories. These sub-directories correspond to the pre-packaged Nitobi Themes that are available for our components.
Specifying Location of Dependent Files
There are many situations where the default dependent file structure is simply undesirable. For instance, you may have several pages that all use some Complete UI components in different directories on your web server, and you don't want to have a copy of the dependent files in each of the directories. Fortunately, you can specify the location of the dependent files right from your component's properties window.
- First, open up your web page in Visual Studio.
- Open the Properties tab (View -> Properties Window or hit F4) and select your component from the drop-down list in the Properties window.
- There are three properties that you need to configure:
- JavaScriptFileUrl: This is the URL that points to nitobi.grid.js for Grid components or nitobi.combo.js for combobox components.
- StylesheetUrl: URL that points to nitobi.grid.css for Grid components or nitobi.combo.css for combobox components. This is the file that, by default, sits in the javascript_css/styles/ directory.
- ToolkitJavaScriptFileUrl: URL that points to nitobi.toolkit.js.
Once you have these three properties configured, you're ready to roll!
Installing CUI ASP.NET Beta 2009
Getting started with the new beta is easy. After installation, you'll find the .dll file to add to your project in the installation directory / bin.net2.0 (for .NET 2.0 framework) or bin.net3.5 (for .NET 3.5 framework). From here, you just have to add the registry assembly directive to each of your .aspx pages:
<%@ Register Assembly="NitobiControls" Namespace="Nitobi" TagPrefix="ntb" %>
Then you can start adding <ntb:> components to your web pages.
Setting up the samples
The beta also comes with a Sample folder. Open this folder as a 'Web Site' in Visual Studio. Right click on the root node in the Solution Explorer and click on 'Add Reference…' Click on the 'Browse' tab and browser over to your installation directory / bin.net3.5 and double-click on 'NitobiControls.dll.' Once that is done, you can Build the web site and there should be no build errors.
Please note that the samples also rely on a SQL Server database for sample data. There is a .bak file in the Sample/grid folder that you can backup to a SQL Server instance for use with the samples. It will create the necessary roles, database, and tables for use with the samples. To set this up properly, please also customize the 'Personal' connection string located in the Sample web.config file. Without setting this to the proper SQL Server instance, your samples will not work properly.


