Developers can mix-and-match both remote and static datasources in Grid V3. For example, you can use a database to populate the table,but a static (local) dataset for listboxes and lookup cells. This tutorial shows how static datasources can be encorporated into your page.
The Static Modes
When binding the grid itself to static data, you must choose a valid mode for the grid to operate in. These modes are:
locallivescrolling - Live Scolling is applied to local data, bringing up pages of data as they are required. Good for large static datasets.
localstandard - Paging is used on the static data, and the paging toolbar is accessible.
localnonpaging - ShowAll is used and all the data in the dataisland is displayed at once.
Other than setting the mode attribute in grid, there is no other special consideration that needs to happen to switch between modes. Everything else stays the same.
Binding the Grid to a Static Dataisland
We'll start with just taking a simple grid and attaching it to a static dataisland. First a definition: dataislands are blocks of data described in the Nitobi XML schema. When referring to a static dataisland, we are referring to a block of data that is actually contained inline in the HTML of the page. Keep reading to see what is meant by this.
Static datasources are contained in <ntb:datasource> tags inside the <ntb:datasources> master tag. Here is an example of a very simple dataisland that could be applied to a grid, or an editor in the grid (like a listbox or lookup field):
The following grid tag will display this data and automatically create columns for each field mentioned in FieldNames.
You can have an arbitrary number of dataislands in the <ntb:datasources> group, each referenced by a different editor.
Binding Editors to Static Data
Being able to bind editors to static data can be useful if the developer does not want to write gethandlers for every databound control (like listboxes, lookup fields, and checkboxes). That said, you can mix and match static, or dynamic datasources in a grid.
Checkboxes
There are a couple ways to bind checkboxes to static data. The simplest way is to use an embedded JavaScript array as follows:
Using a JS Array
Using an XML island.
The difference between these two is with the array we simply use the datasource attribute, but for the external XML island we use the datasourceid attribute and give the ID of the datasource.
Lookups (Autocomplete)
Lookups can refer to static XML islands, similar to how checkboxes can. Simply provide a datasourceid instead of a gethandler and define your displayfield and valuefields.
Then, elsewhere in the ntb:datasources tag, and outside the ntb:columns tag.
Listboxes
Just like lookups, listboxes can also refer to static XML islands using the ntb:datasources tag.
Then, elsewhere in the ntb:datasources tag, and outside the ntb:columns tag.
To download the code used in this demo, click here.
I just followed the same, but grid with data is not appearing on the screen
Poster: sridhar (Friday, July 20, 2007)
I tried all possile ways to get a listbox at my first field of the grid (ie. at (1,1)). I wanted to have the autocomplete feature on my grid. Nothing pops up on selecting the cell. Any way out?
Knowledgebase
To be notified of new articles when they're available, subscribe to our RSS feed.


 Developers can mix-and-match both remote and static datasources in Grid V3. For example, you can use a database to populate the table,but a static (local) dataset for listboxes and lookup cells. This tutorial shows how static datasources can be encorporated into your page.
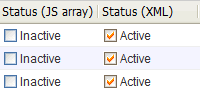 There are a couple ways to bind checkboxes to static data. The simplest way is to use an embedded JavaScript array as follows:
 Lookups can refer to static XML islands, similar to how checkboxes can. Simply provide a datasourceid instead of a gethandler and define your displayfield and valuefields.
 Just like lookups, listboxes can also refer to static XML islands using the ntb:datasources tag.